
If you’ve heard about WordPress meta tags, you may have some idea of the benefits they can provide. Would you like to learn how to add a meta description in WordPress, easily?
WordPress isn’t always as straightforward to use as you might hope, so it’s easy to run into issues when trying to add new features to your site. We take you through the steps necessary to make sure you can set up your meta descriptions and keywords. Find out how to fill in the WordPress meta box, simply and correctly. We also review what benefits adding metadata to your site can provide, looking at how it could help you beat the competition and get more visitors.
The Reasons to Add a Meta Description in WordPress
If your site doesn’t show up near the top of the results, you aren’t going to get the visitors you hope for or think you deserve. It isn’t a case of if you build it, they will come. If they can’t easily see your website in the search results, it was a waste of time creating the site.
This can all be changed, however. The use of Search Engine Optimisation techniques can turn around the fate of most sites.
One way of improving your Search Engine Optimisation is learning how to add a meta tag to WordPress. The meta description in WordPress is a short paragraph about what your site is about and what visitors can expect.
Looking for a complete WordPress Maintenance Plan?
With all ThriveWP care plans, we include free migration, malware removal, daily/hourly backups, plugin theme and core updates, ongoing support and 24/7 security monitoring and firewall.
The meta description forms part of the header in your website and is added as part of the HTML code which makes your site work. This could sound intimidating, but it is actually reasonably straightforward to make changes with the use of a plugin.
Keywords are the phrases people use to find your site in the search engines. They are important when it comes to the success of your website and can also form part of the metadata within your pages. These keywords can also be added to your WordPress site at the same time as adding the meta description information.
The SEO world is full of different opinions about how best to get a website to the top of the search rankings, and the same is true when it comes to the use of keywords in the metadata. Some claimed experts will tell you that keywords are unimportant, while others still recommend adding keywords to the metadata. However, keywords help the search engines to know what should be relevant on the page, so as long as they don’t do any harm, you might as well add them.
Search engines, like Google, don’t reveal exactly how they decide which sites are more relevant either. This doesn’t help matters, but then they couldn’t really reveal that information without their search results being abused.
What we do know is that adding a meta description has the chance of getting more people’s attention when they read through the search results. If you can entice more people to click on your link in the search engine listings, you benefit not only with gaining a visitor, but it shows the search engine that your web page is relevant. This is important since the click-through rate is often cited as a ranking factor. If your site is getting more clicks than is the norm for your position in the results, it shows that your site should be higher up.
There are clearly real benefits to making sure your website meta description tells potential visitors what you want it to. Let’s take a look at how to add a meta description to your WordPress site using the Yoast plugin.
Yoast SEO Plugin
The popular Yoast SEO plugin has over 5 million installations, so you may already have it installed. It allows easy optimisation for your site to rank higher and doesn’t just help you with the meta description on your website. It also gives you other features, including:
- An XML sitemap
- Better control over your site’s breadcrumbs (easier site navigation)
- Help to avoid duplicate content problems
- Schema implementation (to provide better information to the search engines)
- SEO content analysis
These are just some of the features they offer, but it is the WordPress meta box functions that we are interested in today. Let’s get started.
Enabling Keywords in Meta Descriptions with Yoast
The first thing you need to do is sign in to your WordPress dashboard and make sure you have the plugin installed. If not, go to the “Plugins” section in the menu and select “Add New”, search for “Yoast”, install and activate.
Yoast has a team of developers working on the plugin, so it is frequently updated. If you already have it installed, check to make sure it is up to date before going any further.
You will then need to activate the keyword functions within the plugin, as they aren’t turned on by default. Click on “SEO” then “Dashboard” and open the “Features” tab. Click the “Enabled” button in the “Advanced settings pages” section and save the changes. This will activate more options in the “SEO” menu section.
Click on “SEO” in the menu and go to “Titles & Metas” and click on the “Other” tab. Enable the use of the keywords tag and save. The keyword function has now been enabled for the Yoast plugin.
Setting Up Meta Descriptions with Yoast
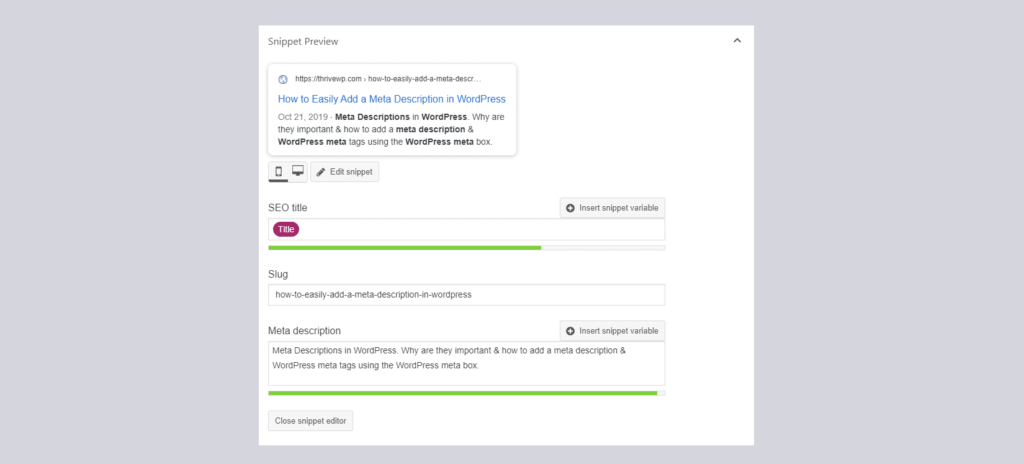
Hopefully, you already have a post which you can work with, if not you need to write one before you go any further. Choose “Posts” from the menu, then click on “All Posts”. Select “Edit” on a post or page you want to work with. Scroll down the page until you see a preview of the snippet which the search engines display for your page. Below that is the “Edit snippet” button, you can then edit the WordPress meta box.
You should also see the “Focus keyword” and “Meta keywords” sections. In the keyword section, enter relevant words and phrases which apply to the post, and make sure to separate them with a comma. These words should already be in your post, keywords which aren’t contained in the content of your post could be considered spam. Only enter a maximum of ten of these keyword phrases.
When you have updated that you can move on to the description, click on the “Edit snippet” button under the preview. This makes the snippet area a place you can edit. You will want to have your main keyword in the description once or twice.
It is also possible to edit the title of the post and the slug (the page name which makes up the address), though it is probably better to leave these as they are. If you go changing the slug, any links which point to the page will be broken.
There is a coloured bar under each of the sections. This gives you an indication of how good Yoast thinks your title, slug and description are. Green indicates that they think it is about right. They factor in length and also if it contains your focus keyword, amongst other things. Don’t worry too much if you don’t get the green bar, though. Just make sure you describe what the page offers, and if you can give some enticing reason for someone to visit your page, all the better.
If you are happy with what you have done, click the “Close snippet editor” button. The preview should display your new description. Save your post to have it go live on your site. This will be updated on the search engines after they have paid a visit to your website.
Then you just need to repeat the process for your other posts and pages.
Setting Up Meta Descriptions for Your Homepage
It is a good idea not to forget the homepage of your site when adding descriptions and keywords. Click on the “SEO” button in the menu once again, then “Titles & Metas” and click on the “Homepage” tab.
The title, description and keywords can all be updated here. Remember to save your updates before going anywhere else.
Adding WordPress Meta Tags to Categories and Archives
It is also possible to add metadata to your categories and archives. Click on “Posts” at the top of the menu and select “Categories”. Choose a category to add metadata to and click the word “Edit” underneath it.
You should now have a page which gives you category editing options. Scroll down to the “Snippet preview” and click on the “Edit snippet” button below. Add an appropriate description for the category.
To add keywords for the category, you need to click on the “Settings” button. Once you have filled in a few keyword phrases, remember to click on the “Update” button to save what you have done so far.
Repeat the stages you have done here for the other categories and archives.
As you can see, adding meta descriptions and keywords to your WordPress site isn’t all that difficult once you’ve got the hang of it. All you need to do now is to remember to add the meta tags to every new post you create for your site. Hopefully, this work will lead your website to gain a few more visitors in future when you move up the search engine results.